If you have been treating your social media updates as a “one and done” approach, listen up.
There’s a smarter way to get more out of your social media efforts.
Especially if you use Buffer.
It’s true, hear me out.
An expert has said that if you do anything twice, you should stop doing it. Anything you are doing twice can be outsourced or automated. So look to create a process so you can be more efficient with it.
And I couldn’t agree more.
It’s one of the core principles behind the development of Bulkly.
In fact, I already showed you how everyone has been using RSS feeds in the least effective way.
Look, it’s no secret that a great content strategy focuses around the creation of evergreen blog content. One of the biggest benefits is you get results from that content day after day, month after month.
Evergreen blog content doesn’t go out of style. It’s the gift that keeps on giving.
Most notably in regards to organic website traffic.
Instead of churning out new blog posts everyday only to get stuck in a cycle of suck, where your process is simply write, publish, repeat – evergreen blog content has a process of write, publish, market.
It’s no secret that many experts feel you should apply the 80/20 rule when it comes to your blog.
At it’s core, it means that you should spend 20% of your time creating your content and the other 80% promoting it.
Now, promotion can be many things like link building, paid search, or social media.
And if you are a believer of the 80/20 rule, today I am going to show you how you can automatically recycle social media updates to help with your 80% promotion strategy.
Best of all, once you’re set up it runs like clockwork – automatically.
So here’s what I’m going to cover:
- Identifying your evergreen content
- Create social media updates for your evergreen blog posts
- How to organize and recycle social media posts
- And I’ll show you how to recycle all your social media updates in Buffer
Whether you are interested in recycling tweets, building out a library of social media updates or creating an evergreen social media queue for your Buffer account – I’ll show you exactly what you need to do. So let’s jump right in.
Find Your Evergreen Blog Content
Now this step might be easier for you than others, but you’ll need to create a list of all your blog content. There are a number of ways to do this. And no matter which way you go, it’s best to use Microsoft Excel to document this.
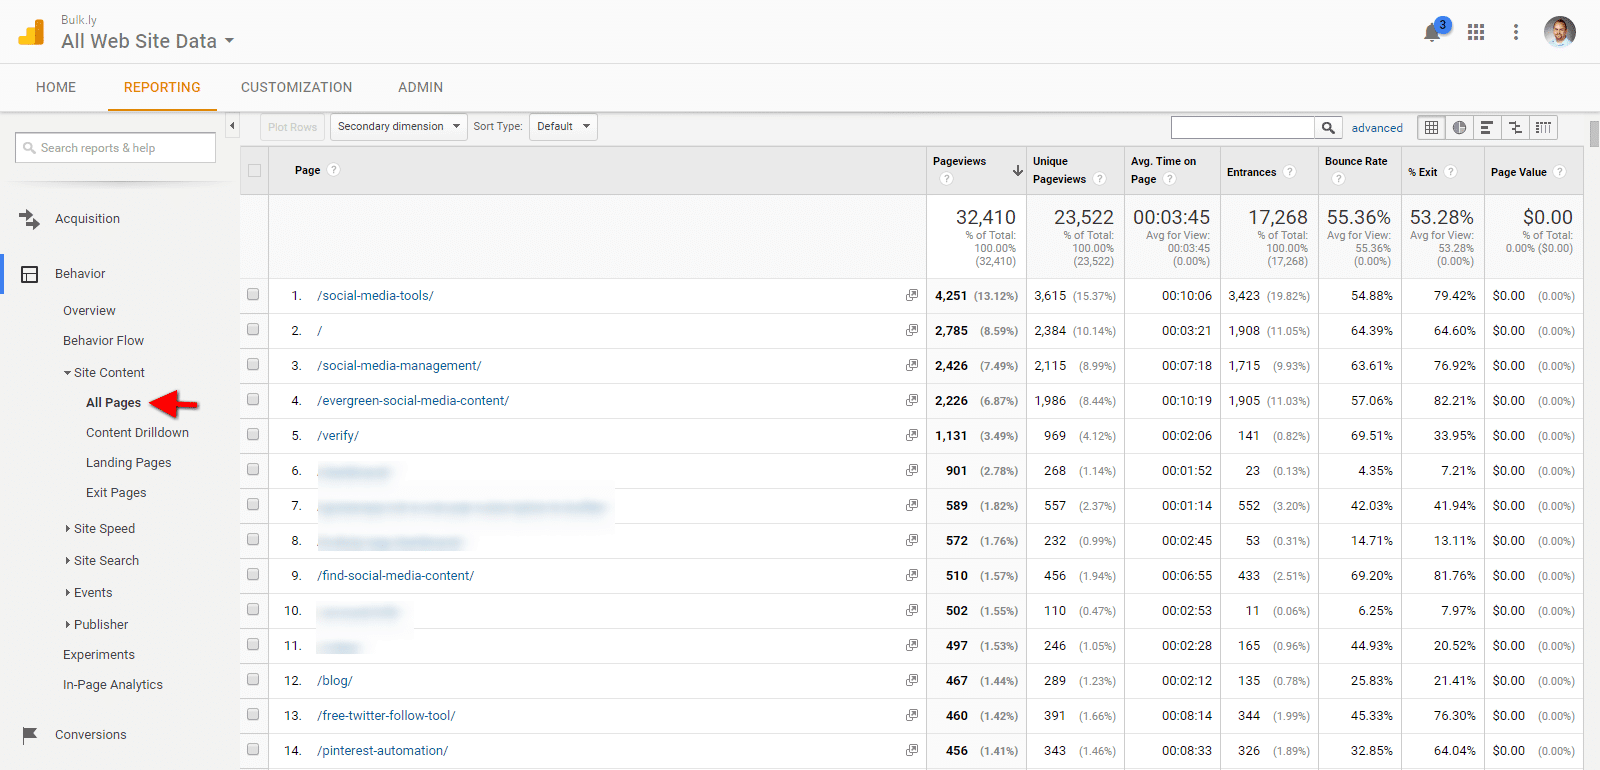
For me, the easiest thing to do jump into Google Analytics.
In your Google Analytics account:
- Depending on your traffic, change your date range to the last 3 months, 6 months, YTD, etc. to get a decent amount of data
- Go to “Behavior > Site Content > All Pages”
- Then, change the “Show Rows” setting to show 5,000 (or whatever number is higher than your number of results)
- Export the results in a CSV and open up in Excel
[Bonus Tip] – If you have all your blog posts living in the “/blog/” category structure, you can filter to show only these results in analytics before exporting. Otherwise you can just filter for them in Excel.
Once your file is open in Excel, filter and skim through your list to remove anything that is not evergreen content.
If you have hundreds of posts, you might want to first focus on the ones that drive the most traffic, engagement, etc. So feel free to filter down your list if you need to.
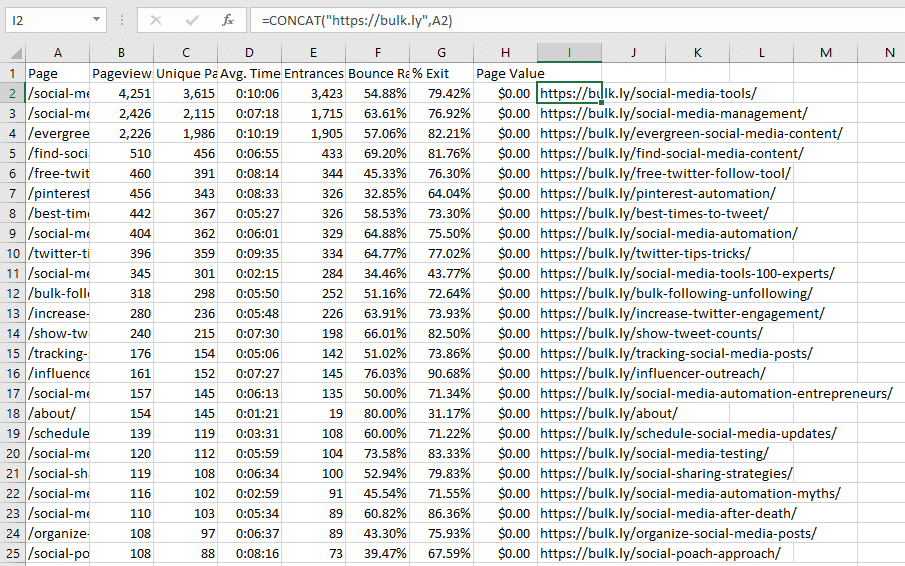
The last thing you will want to do in Excel is turn your posts listed into actual URLs (this will come in handy later). If you have cleaned up your file like mine (below), enter this formula into Cell I2 (replace “YOURSITE” with your URL):
[perfectpullquote align="full" cite="" link="" color="" class="" size=""]=CONCAT("https://YOURSITE",A2)[/perfectpullquote]
Then drag, the formula down to the end of your results.
What if You Aren’t Using Google Analytics?
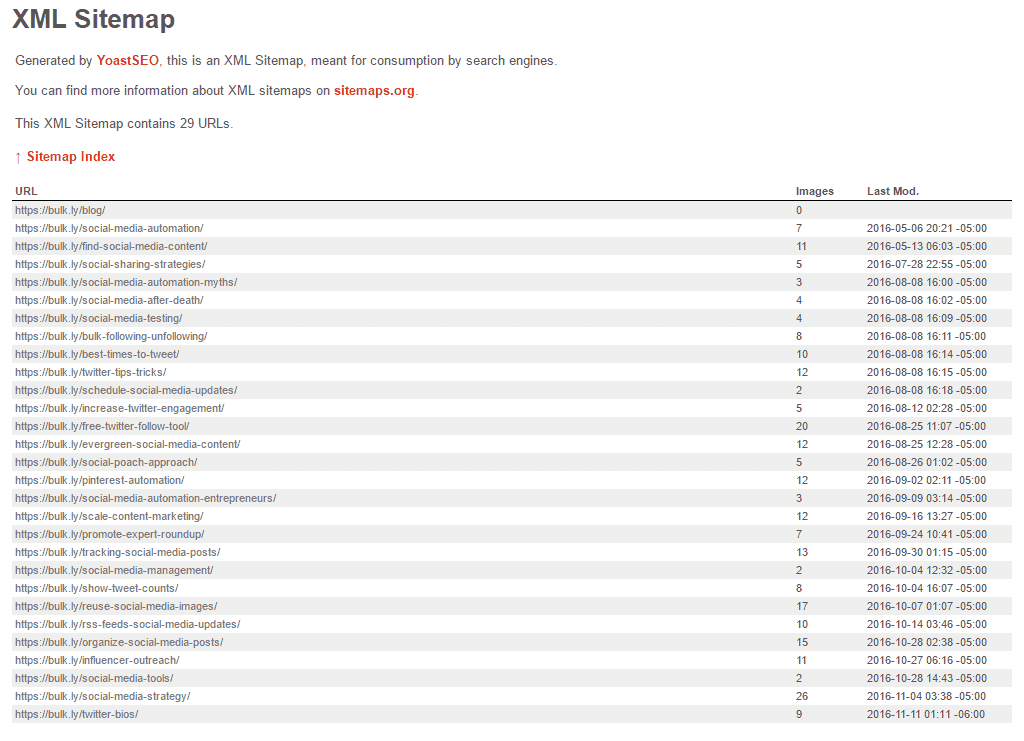
No worries, I’ve got a quick little hack involving your Sitemap.XML file and this Chrome Extension. This also works especially well if you have hundreds of blog posts.
The first thing you will need to do is locate the location of your sitemap file. For Bulkly, it is https://bulk.ly/post-sitemap.xml and looks kind of like this:
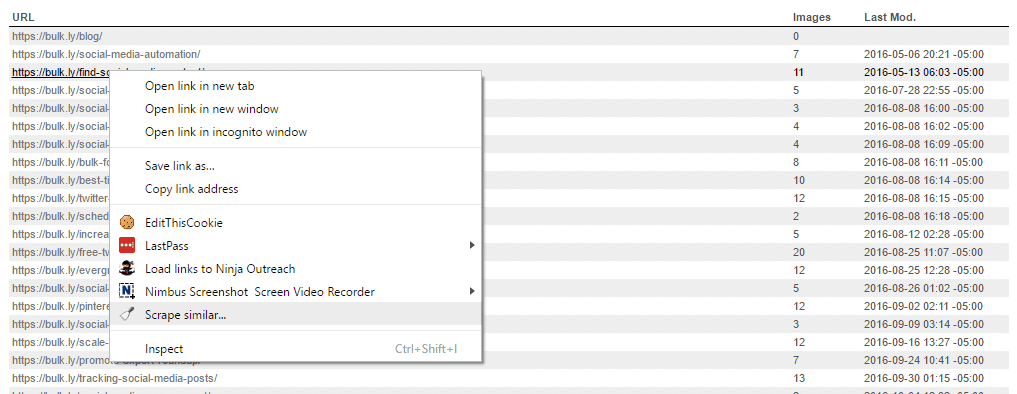
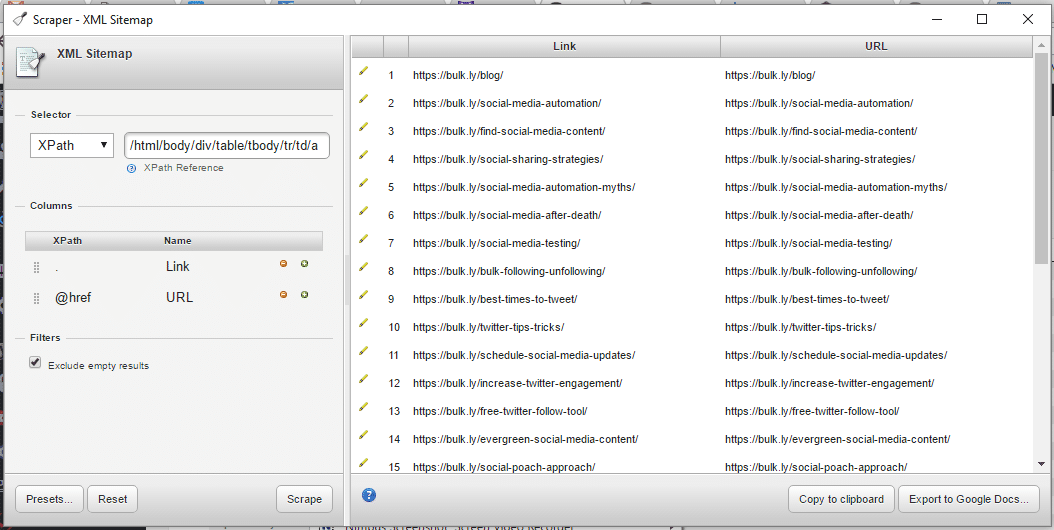
Make sure you have installed the Chrome Extension and right-click over one of your URLs and select “Scrape Similar”.
You’ll then get a window with the results:
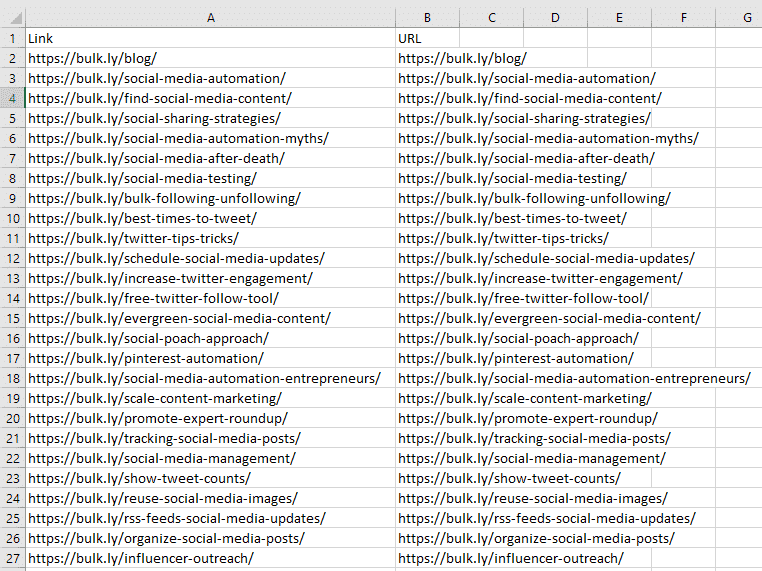
You can click the “Copy to clipboard” button then open a new sheet in Excel, click on Cell A1 and then right-click paste values:
From here you can delete one of the columns and start sifting through your results leaving only evergreen content.
Of course there are other ways to get this data, but I find these two approaches as being the easiest and working on most sites.
Create Social Media Updates for Your Evergreen Blog Posts
Now that you have identified what posts are evergreen blog content, it’s time to create evergreen social media updates for each of these posts.
I’m going to walk you through a real example of a recent blog post I published here on Bulkly about organizing social media updates.
When creating recycled social media posts, you will want to have a nice variety of status updates saved in a “library”. This will help change up what you are posting and not have you posting the exact same thing again and again.
As I mentioned before, it’s best to use Excel to document all of this. So open up a new sheet and let’s get started.
Use The Blog Post Title
The easiest way to create social media updates is to simply use the post title as your status update. This has been a common approach with social media status updates since the beginning.
Reason being is that your title should be very enticing for someone to click on (or at a minimum reshare with their audience).
In Cell A1 of my Excel file, I enter the blog post title “How To Organize Your Social Media Posts Like a Genius”.
Grab Your Subheadings
What I find that make great updates for evergreen social media posts is to use most of my subheadings. Many of these could stand alone as their own blog post and are typically perfect in length and clickability.
Looking at my blog post, I have found these subheadings for my library of evergreen social updates:
- Why it’s Important to Organize Your Social Media Updates
- What You Need to Do to Organize Your Social Media Posts
- Different Ways to Use Organization to Be More Strategic With Status Updates
- Organizing Your Social Media Posts
I add each of these to my Excel file.
Now some of my posts will have more or less optimal subheadings to use, but more times than not I get 3-5 solid pieces to use for my recycled status updates.
Pull-Out Quotes
I don’t necessarily always quote someone else in my blog posts, but that doesn’t mean I can’t quote myself.
For example, when reading the blog post I might see something that I wrote that really stands out. And when I see something like this, they are typically perfect for a status update. Here’s what I found:
- When it comes to my social media updates, my organization is solid. And depending on who you ask, I’ve been told I’m a genius.
- I will say that I’m pleased with how I can organize my social media posts.
- So how can you organize your social media accounts?
- To stay on top of your social media organization game, you will need two things…
- Have more organization and control of how often and where updates get added to Buffer.
- A genius way to organize your social media updates, not look like a robot, and automate various types of status updates
- How organized are you currently with your social media posts?
- What are you currently doing to organize your social media updates?
Of course, if you are quoting other people in your content add them to your Excel file if it makes sense.
Key Statistics
This won’t apply to all of my blog posts, but if I cite a metric or number from research I always make sure to add it to my social media content library.
Using numbers in your blog post as well as your status update is a no-brainer. People love data.
Don’t just rely on third party numbers – if you have done your own research or analysis you should definitely create a few social updates around it.
I guess I should have picked a better blog example since this one doesn’t have any key statistics.
Quick Thoughts & Summaries About the Blog Post
I often find myself mentally summarizing sections of my blog post as I re-read it. And these are perfect to add to your Excel file.
Most of the time my subheadings capture the general topic of the section, but there’s always ways to rephrase or reword something.
One thing I like to do is think about how I can explain the blog post in a sentence to someone who hasn’t read it. Most of the times these are very conversational in tone and fit in nicely with my bank of evergreen social media updates.
Share Your Images
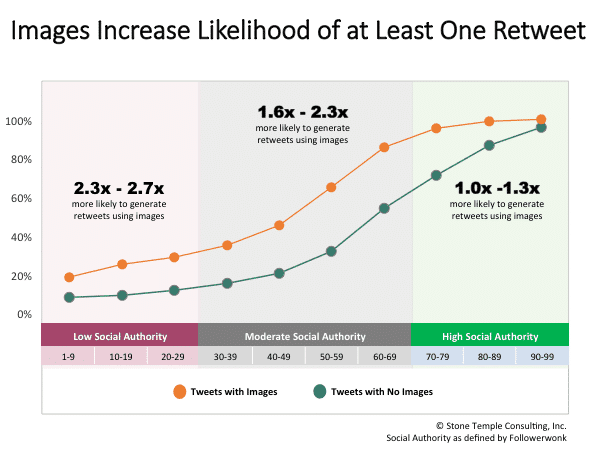
It’s no secret that images help increase social media engagement. In fact, using images can increase your chances of being retweeted.
I make a conscience effort to use multiple images in my blog posts. Most of the time they are screenshots demonstrating what I am talking about.
Now, you might be wondering what is the best way to share images? Especially in the context of recycling social media updates.
Here’s what I recommend – use your blog post title and pair it up with the image.
Or mix and match your images with the list of updates you have added to Excel.
In order to prepare you Excel file to be utilized for an evergreen library of recycled social media posts you will need to paste the direct URL of the image in Column C.
For example, if I want to use this image:
I will paste the direct URL of https://bulk.ly/wp-content/uploads/2016/10/organize-social-media-posts.png into Column C of the Excel file, with Column A containing the text of my status update and Column B for the URL of the blog post.
If you don’t want to use an image, just leave that column empty.
To instantly double your social media queue library for recycling posts, you can copy all your text updates and add images to them. So you will have one set of updates with an image and the exact same updates without an image.
How to Organize and Recycle Social Media Posts
As you have noticed, you can easily build out your Excel file with dozens of status updates for a single post.
But the million dollar question is, “How can you use this to build out a library of social media updates that can be recycled?”
Stick with me…we are almost there.
Most of you are probably familiar with Buffer.
Buffer is one of the leading social media scheduling platforms with millions of users.
But there’s just one glaring problem.
You have to manually add your status updates to the queue.
Ain’t nobody got time for that (at least I don’t).
And lucky for you, I have created a solution to this problem – Bulkly.
Bulkly allows you to effortlessly drip your social media updates into your Buffer queue.
Not only that, but Bulkly can recycle your social media posts automatically.
Think of it as an evergreen social media content scheduler. A way to create recycled content for social media.
Once it’s setup, you don’t have to do anything. Your status updates are sent to your Buffer queue like clockwork.
[yellowbox]Start recycling your social media content today with Bulkly. Connect your Buffer account to start your FREE trial. Start My Free Trial. [/yellowbox]
So here’s how it works:
- With a few tweaks to your Excel file you have already created, we will upload it to Bulkly
- Pick and choose how many times per (day/week/month) to drip an update to Buffer
- Select the social media accounts we want the updates added to
So, once you have a Bulkly account let’s create your own library of recycled social media updates.
Tweak Your Excel File
With Bulkly, you can upload a CSV file of social media updates. A CSV file is basically an Excel file format that when saved separates the columns of data with commas.
But enough about that.
Here’s what you need to do with the Excel file you have been working in:
- Insert an empty row at the top
- Insert a new empty column to the left Column A
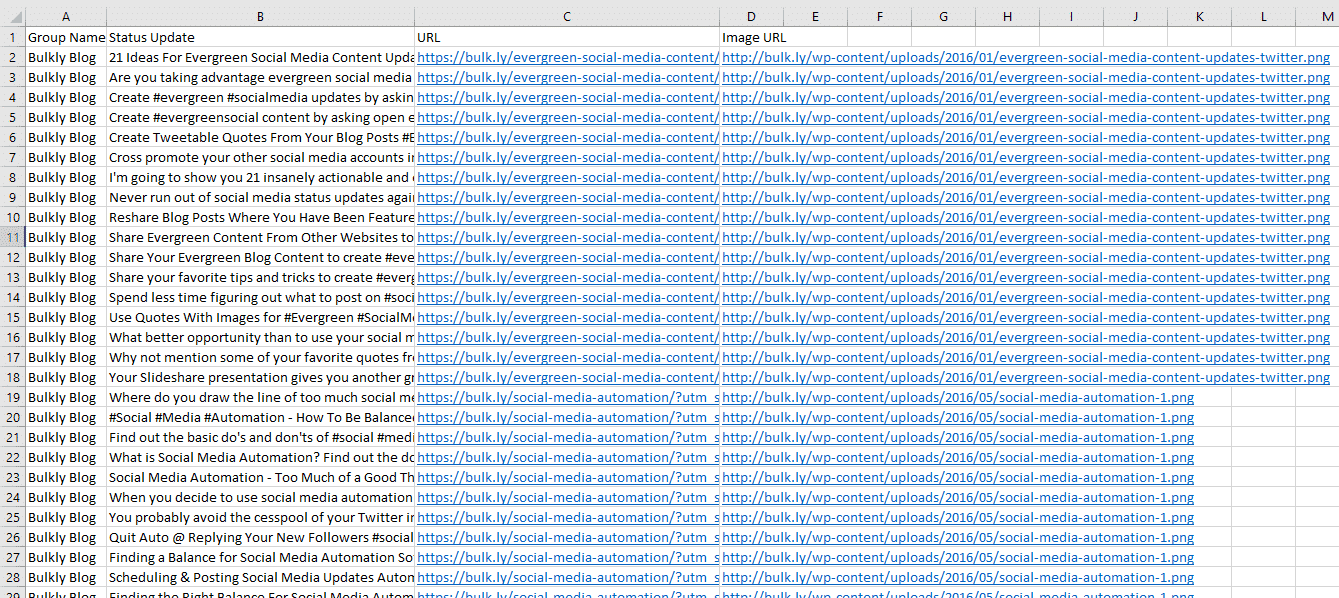
The empty row across the top (Row 1), is your header column. So let’s label it as follows:
- Column A – Group Name
- Column B – Status Update
- Column C – URL
- Column D – Image URL
Now, Columns B-D are pretty self explanatory – but you might be wondering what the “Group Name” column is for?
With Bulkly, you can organize your social media updates into groups. For example, you can create all sorts of groups such as:
- Social media updates for a specific account (Twitter, Facebook, etc.)
- Groups based on topics of posts (great if you cover a lot of different topics on your blog)
But for the purpose of this, let’s create a single group name and then make sure it is copied all the way down to the last social update you have. And once you have gone through one (or all of your evergreen blog posts) it will look like this:
You can easily create hundreds or even thousands of social media posts to recycle.
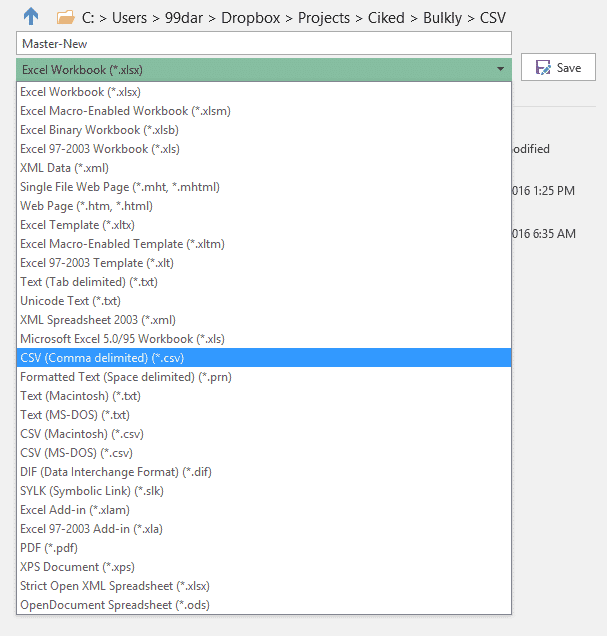
Then what you need to so is save the file as a “CSV”. To do this, click “File > Save As” and select CSV as the file type from the drop down menu.
Up next, it’s time to add all of your evergreen social media updates to Bulkly which will drip them to your Buffer account.
Upload Your CSV to Create Recycled Social Media Posts
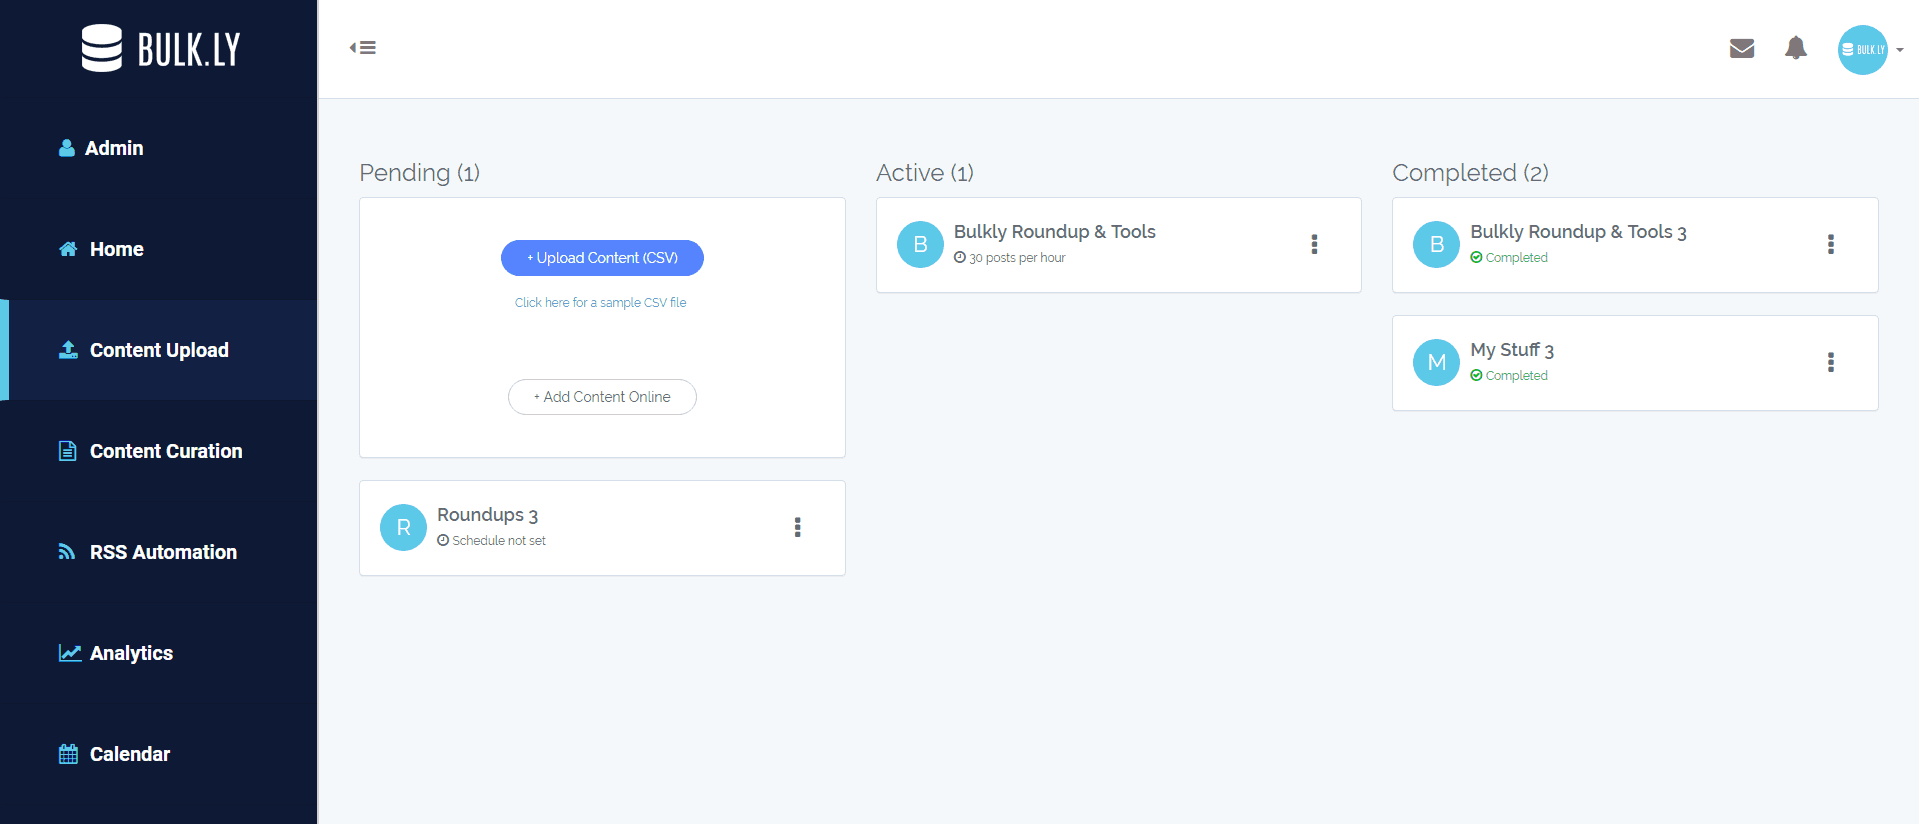
Once you are logged in to your Bulkly account, from your Dashboard click on the “Content Upload” button. Then click on the “Upload Content (CSV)” button and locate your CSV file.
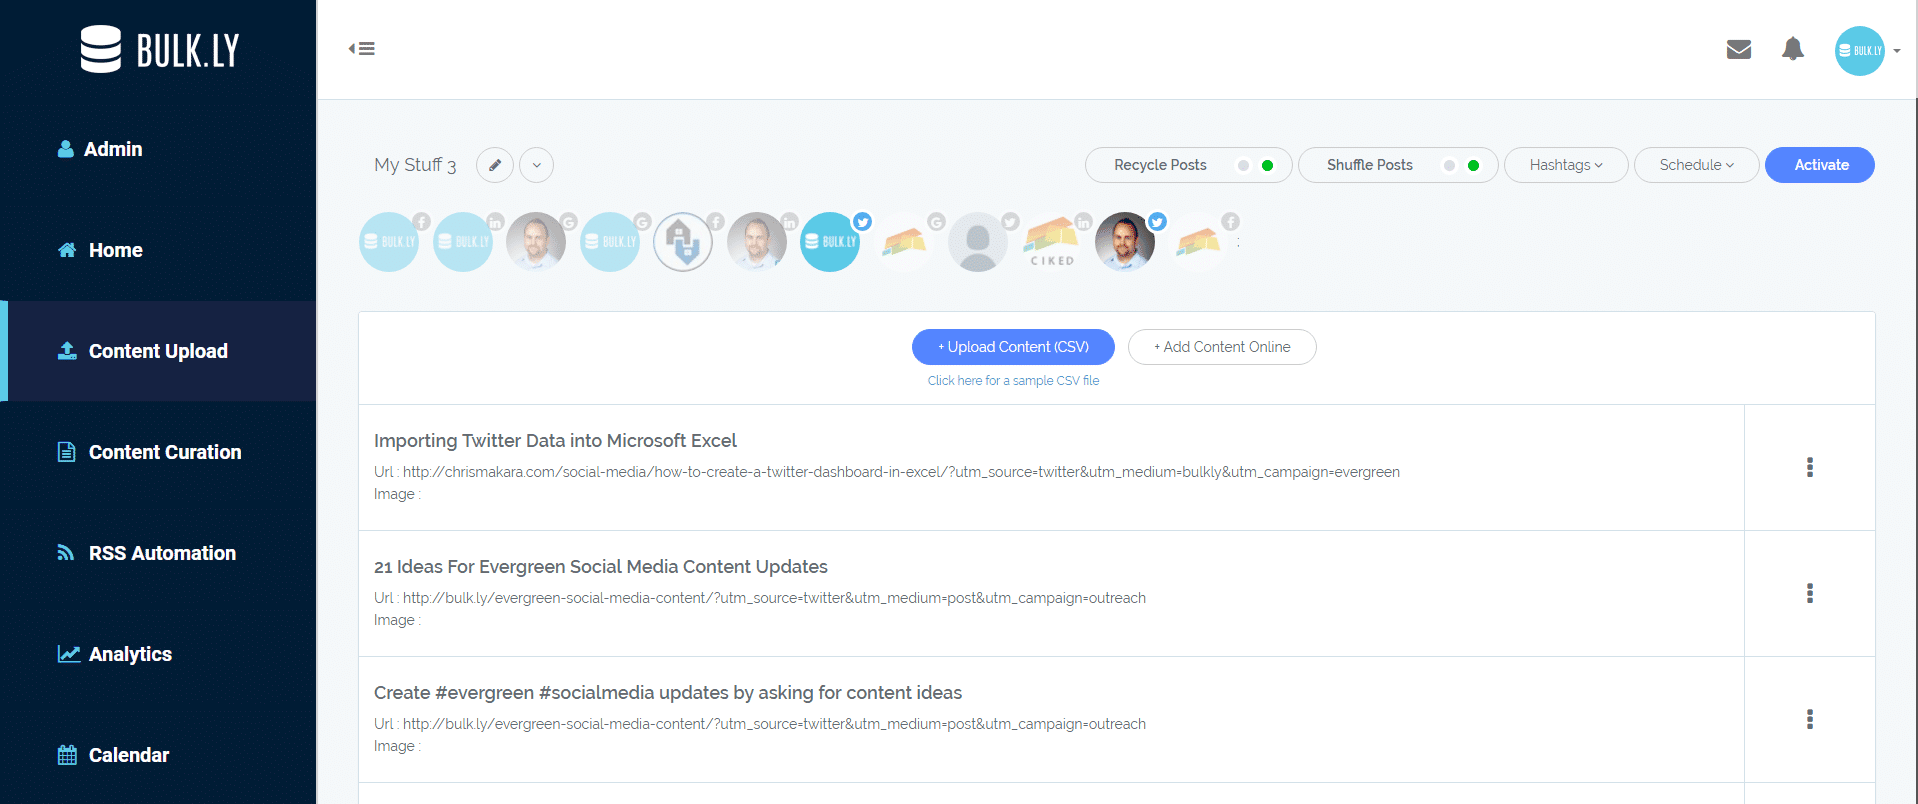
Within a few seconds all of your data from the CSV will appear in Bulkly.
From here you can click on any of the updates to make edits or decide to delete one you might not want to use.
Once you are ready, you’ll need to choose the settings for this group of posts.
Within this area you will need to make sure to click “Recycle Posts” as enabling this will tell Bulkly to drip these updates again and again to your Buffer account.
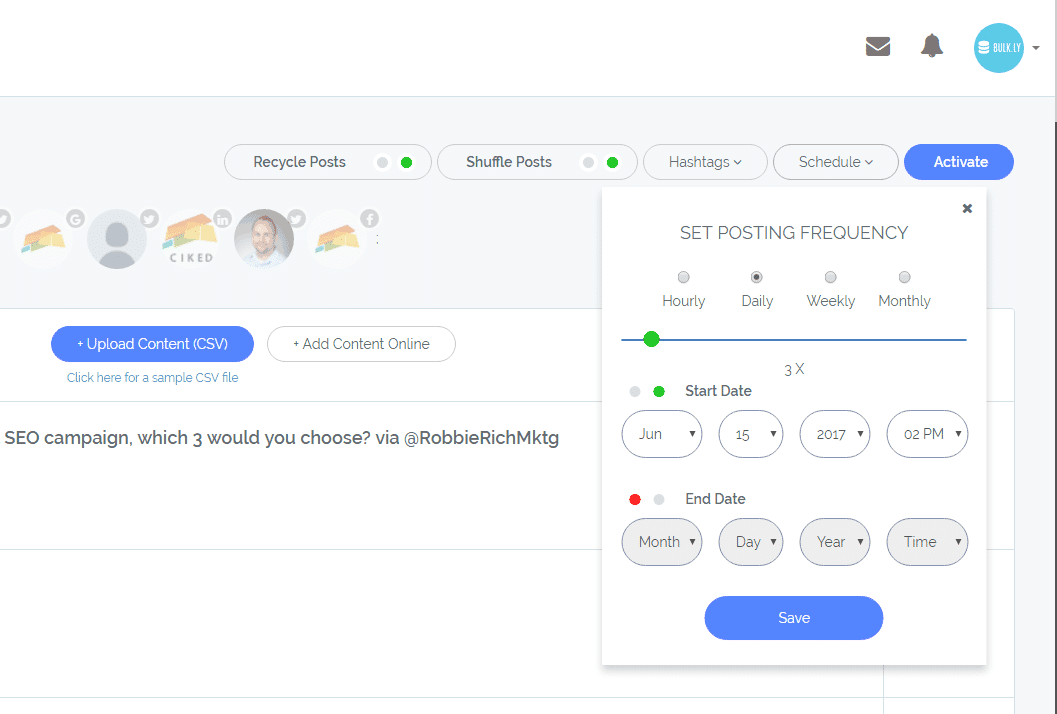
You will also need to select how many times (daily/weekly/monthly) do you want these posts dripped.
I also recommend enabling the “Shuffle Posts” option as this will randomnly pick an update from your group to send to Buffer. Otherwise it sends the posts in order listed.
Lastly, you need to pick which social media accounts you want Bulkly to drip these updates to.
Then, click the “Activate” button.
Depending on your settings, you should see your first update appear in your Buffer account within a few hours.
Your social media updates will be recycled forever.
[yellowbox]Start recycling your social media content today with Bulkly. Connect your Buffer account to start your FREE trial. Start My Free Trial. [/yellowbox]
Recycling Social Media Posts in Buffer Automatically
When it comes time to automatically recycle social media posts in Buffer, it is a pretty straight forward process with Bulkly. Yes, it might take a few minutes to build out your spreadsheet for your social media recycling campaign – but you will be able to leverage this work again and again. Automatically.
For years I had been looking for an easy way to create a library of social media updates that can be recycled automatically.
Unfortunately I never found a solution that did what I needed it to do – so I set out to build Bulkly.
And with it, I can easily share status updates of my evergreen blog posts again and again.
I’d like to know…
Are you recycling your social media updates in Buffer?
What are your thoughts on this approach – let me know in the comments below.
[yellowbox]Start recycling your social media content today with Bulkly. Connect your Buffer account to start your FREE trial. Start My Free Trial. [/yellowbox]


